Tag Archives: < 30 min

Chocolate Chunk Cookies {Whole Wheat Flour}

9 Sep

WWChocChip-1

Isn’t it interesting how everyone’s chocolate chip cookies turn out differently? One hundred people using the same recipe – Nestle’s Tollhouse for example – will turn out one hundred variations … never mind the infinite recipe options for a good ol’ fashioned chocolate chip cookie using butter, flour, sugar, and egg.

But my own chocolate chip cookies always turn out the same as my last batch, and I have always been fine with that. Sure I have tried some variations – browned butter coming to mind – with success, but I have found myself revisiting my standard recipe time and time again.

I am pleased to announce that I am ready to shake things up a bit, with both whole wheat flour and hand-chopped chocolate chunks.

I have a non-local friend who was in need of a pick-me-up; when I asked if I could send cookies, he mentioned that he is not eating white flour but would love whatever I sent (… and that his partner is partial to chocolate chip. Good man!). I thought I would give a wheat flour recipe a try, just for something a little different, before trying a non-traditional cookie recipe. I hoped I would find a cookie to fit the bill – I did not imagine I would find a chewy, chocolatey new addition to my repertoire!

My search turned up a straightforward recipe, which intrigued me with its simplicity. I was at first skeptical, so I made my first batch a half-recipe’s worth. The batter (of course I snuck a bite) had a deep molasses flavor. I was a little worried, it was a little strong for me. But the flavor baked out evenly, and with my first bite of one of these freshly-baked cookies, I was immediately kicking myself for not making a full batch. Another half-batch followed quickly after.

Image

My favorite part is the chocolate chunks (see, e.g., that square right above this sentence). The chocolate chip selection at my local grocery stores is not as awesome as I would prefer (I am not sure what I am looking for – but some variety would be nice). I never thought to make my own! Thanks to this recipe, I tried it out. How had I never heard of this method before? I used a thin Ghirardelli baking bar and chopped each square into smaller squares with my 7″ chef’s knife – make sure to sweep all of the shards that result from the chopping in to the batter, the flecks will only add to the cookie.

Ingredients:
– 2 sticks cold unsalted butter, cut into 1/2″ cubes
– 1 c packed dark brown sugar
– 1 c sugar
– 2 eggs
– 2 t vanilla
3 c whole wheat flour
– 1 1/2 t baking powder
– 1 t baking soda
– 1 1/2 t kosher salt
– 8 oz bittersweet chocolate, coarsely chopped into small squares

How do I make it?

  • Preheat the oven to 350. Line two cookie sheets with parchment paper.
  • Combine the butter and sugars in a large bowl and beat until just blended.
  • Add the eggs one at a time, mixing to incorporate after each addition. Add the vanilla and briefly mix.
  • Add the flour, baking powder, baking soda and salt and mix until just blended. It’s a lot of flour, so do it in small increments so it doesn’t poof out of the bowl!
  • Stop to scrape down the sides and bottom of the bowl and mix again until blended.
  • Add the chocolate and beat on low speed just until evenly distributed.
  • Scoop the dough by heaping tablespoon. Roll each scoop into a ball with your hands and flatten it gently on the cookie sheet using your hand. Place them a few inches apart on the cookie sheets, as they will expand to large chewy awesome discs.
  • Bake for 15 minutes (check at 12 minutes) until the cookies are golden brown on the outsides, and smell delicious.

Original link: http://www.amateurgourmet.com/2011/10/whole-wheat-chocolate-chip-cookies.html

our-growing-edge-badgeThis post is part of the monthly “link up party” called Our Growing Edge, which is an online way to connect food bloggers and inspire us to try new things. Our Growing Edge is the brain child of Genie from Bunny Eats Design, and this month is hosted by Marnelli from Sweets and Brains. The posts for September’s link up can be found here. New for me with this post: whole wheat flour in (delicious) cookies, and hand-chopped chocolate chunks!

Chicken Burgers {Portobello, Edamame, Red Onion}

2 Sep

Chicken Burgers 3

In this recipe, you make your own ground chicken. Are you both intrigued by, and skeptical of, that statement? I admit that I would have been, before I first processed my own meat. I promise you though: a food processor will make short work of chicken breasts; add a few mix-ins and you have a healthy, fast dinner with a complex taste.

This recipe uses a bit less meat than a normal burger, but I promise you it will be filling; it is a great way to trick yourself (or others) into a healthier dinner. If you have a food processor, you can assemble the ingredients in 5 minutes, and cooking only takes about 10 minutes more. Chicken burgers are a great option to assemble on a Sunday and then toss on the grill or range on a Monday night.

Ingredients:

1 portobello cap, roughly chopped in to pieces that are about 2″ x 2″
– 1/2 small red onion, roughly chopped into a few pieces
– 1 cup frozen shelled edamame, thawed {this has always been confusing to me, so I will clarify – “shelled” means “not in the shell”; to thaw, just pour the edamame into a bowl, and cover with very warm water for a minute}
– 2 cloves garlic, roughly chopped
– 2 boneless, skinless chicken breasts (6 oz each), roughly cut in to pieces that are about 2″ x 2″
– 1-2 T reduced-sodium soy sauce
– 1/4 t cayenne pepper {add a bit more if you like spicy food!}

How do I make it?

  • In a food processor, process mushroom cap, onion, edamame, and garlic until finely chopped – this should take only a few pulses.
  • Add chicken, soy sauce and cayenne. Pulse until chicken is chopped and ingredients are combined – this should only take a few pulses as well.
  • Empty the mixture into a bowl, divide the mixture in half, and form each half into 2 patties, for 4 total patties (or more, if you would like to make sliders).
  • Heat a large skillet over high heat. When the pan is heated, add a bit of extra virgin olive oil.
  • When the oil is heated, swirl it around the pan, and add the patties. When the burgers look like the outside is a little more than halfway cooked (the cooked carmelization creeps toward the top, and the bottom is a pretty-but-not-burned brown}, flip the burgers. This should be about 5 minutes. I recommend spraying the pan with cooking spray while you are flipping and the burger is off the pan.
  • Lower the heat to medium and cook on the second side until the bottom browns. This should be about another 5 minutes.
  • At this point, the burger should be done, but until you are confident in your timing, I strongly recommend sacrificing one of the burgers and cutting it in half, checking to ensure all the chicken has turned white.
  • Serve on a bed of lettuce, or with lettuce, tomato, and avocado slices on whole wheat buns. Or top with hummus, like avocado hummus {recipe coming soon!} and eat it on its own.

Chicken Burgers 4

More information please?

One of the reasons I like to process my own chicken to make ground chicken is that it gives me control over what I am eating. I can buy certified organic boneless chicken breasts when/if they are on sale, and trim off the little pieces that I find unappetizing. I am happier when I know what I am eating!

If you don’t have a food processor, you need to chop the mushroom, onion, and edamame as small as possible – and use pre-ground chicken.

Chicken Burgers 2

Original link: http://www.self.com/fooddiet/recipes/2013/03/spicy-chicken-burgers

Serve with:

Cucumber - Avocado Salad Food_013_How to: Roast Asparagus

Brunch Bites: Polenta, Egg White, and Sweet Potato Hash

17 Aug

Polenta BiteBrunch food can take many forms, from savory to sweet and everything in between. Pretty much anything goes, right? Just serve it between 10 and 2 on Sunday with a Bloody Mary on the side, and you can call it “brunch.” I even convinced a woman in the elevator at work on her way to grab a late breakfast in our cafeteria (or early lunch – she didn’t care – she was just hungry!) that she could eat whatever she wanted because it was 10:45, and thus, brunch. Unfortunately, there was not a Bloody Mary to be found. Add this dish to your list of brunch ideas!

Polenta is a corn meal dish that comes in two forms. Prepared and formed into a log (as used and shown here), it is a great shortcut for more complex dishes. The corn meal can also be made in to a creamier dish very similar to grits (with just a small difference with the grains used). Polenta is good for you, filling, and gluten free – a great way to start your day. If you are using a recipe with polenta, make sure you are sure which type you are supposed to use!

No matter what you are serving for brunch, this little ditty can be served alongside. Or try a top-your-own polenta bite bar (or, less extravagant, a plate with some toppings, to pass around the table). Pictured here, the polenta round is topped with egg white, sweet potato hash, and pico. Other ideas you can use: finely chopped sauteed mushrooms and onions, shredded cheddar cheese, finely diced avocado, crumbled bacon, and/or a dollop of pesto.

Ingredients:
– log of polenta, sliced in to 1/4″ rounds
– egg whites, separated from yolks
– one sweet potato, peeled and shredded
– pico de gallo

How do I make it?

  • There are three main components: polenta, egg, and sweet potato.
    • Polenta:  Heat a large nonstick skillet or saute pan over medium-high heat; when hot, spray with cooking spray. Place a few polenta rounds in the skillet and heat until they start to brown on the bottom (about 5 minutes, but keep an eye on them). Flip (spray the pan again while the polenta is off the surface, if necessary), and cook a few minutes more, just enough to brown the flipside. Remove the polenta  from the pan. Repeat, depending on how many you plan to make.
    • Egg:  Heat a small nonstick skillet over medium heat; when hot, spray with cooking spray. To separate the egg whites, crack each egg above a small bowl, pouring the yolk back and forth from one half of the shell to the other and letting the white fall in to the bowl (discard the yolk and shell). Gently add enough egg whites to cover the bottom of the preheated pan (anywhere from 2-4, depending on your pan). Let it cook until set (do not scramble). This should be a minute or two – keep an eye on it. Flip and cook for 30 seconds more. Remove the egg white to a cutting board, and repeat with more egg whites. When cooked, stack the egg whites on the cutting board, and using a round cookie cutter smaller than the diameter of the polenta rounds, make small egg white circles.
    • Sweet Potato:  Heat the large nonstick skillet again over high heat, and add a bit of extra virgin olive oil. Add about half the shredded sweet potato, and cook, stirring after it starts to brown, until it softens and starts to crsip.
  • Stack the polenta, then egg white, then sweet potato hash. Top with pico. Serve on small plates as a brunch “appetizer,” or let me know how the “polenta bar” goes for you!

Caprese Skewers

16 Aug

Caprese Skewer-1

How about a no-cook, easy, crowd-pleasing appetizer? How about another way to serve and eat cheese?

Yes, please?

These Caprese Skewers are great for cocktail parties – for any party really. When entertaining, I like to have a few things prepped in advance (and one fragrant dish in the oven as guests arrive so it smells inviting). This dish takes just a bit of assembling, but you can make the skewers in advance and pull them out of the fridge at the last minute as your guests start arriving. Or do you have a trusted friend who always arrives early and asks how they can help you in the kitchen? This is the perfect task for them.

For MMH’s bachelorette party, we had wine, cheese, and cheese-themed snacks laid out as people arrived at the house. Everyone had a skewer in her hand within minutes (and because we had made a trip to Costco for the weekend, we all had skewers in our hands all weekend.

Ingredients:
– grape tomatoes
– small mozzarella balls (approx 1″ diameter), in marinade (called bocconcini)
– small basil leaves

How do I make it?

  • On each skewer, layer: tomato, basil, cheese; tomato, basil, cheese. You can do another round if you want, but it becomes more of a commitment after two rotations.

Skewer Sunset

More information please?

One pint-sized carton of grape tomatoes will match up pretty well in number with a small bucket of marinated bocconcini (try Trader Joe’s if it is convenient for you). And if you are having a larger gathering, one Costco-sized carton of grape tomatoes will match up with a Costco-sized bucket of marinated bocconcini.

I recommend using small basil leaves rather than cutting or ripping larger basil leaves, because the exposed cut edges will brown and not look as appetizing as small full leaves.

Present the skewers on a plate, or in a vase or pitcher (cheese side up!).

As the assembler from MMH’s bachelorette bash, bridesmaid NB, noted, the oil in that bucket does wonders for your cuticles. Always looking at the bright side.

Fave: Food Processor

10 Aug

At a recent Cooking Club, AWP asked the group: “What kitchen appliance can you not live without?”

I answered first, and quickly.

“Food processor.”

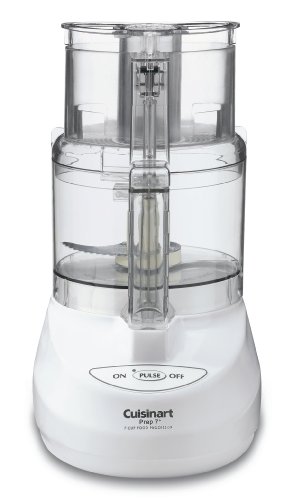
Sturdy, dependable, versatile, fast. I present to you: my food processor. Available on Amazon.com for $69.99, shipping included. In my opinion, that is a great value for this product. [Note: Rats, looks like that price was temporary. Click on the next link to find out today’s price.] Click here to purchase!*

7 Cup Food ProcessorI am happy just looking at it.

Food processors are so versatile. I started using it to make home-made hummus (after a failed experiment with a potato masher) and blend soups. Once I started making green smoothies and needing a little more room in the work bowl for the leafy greens, my food processor stepped right up. Who knew that Chocolate – Hazelnut Spread would come together in the work bowl in seconds, with the very slight heat from the blade melting chocolate? Not me – you should have seen my face.

If you keep it on your counter, at the ready, you will find all sorts of uses for it. Once you are comfortable with the primary blade, try the shredding disk. Did you know that when you buy pre-packaged shredded cheese, it includes several ingredients other than “cheese”? And pre-packaged shredded cheese is generally not gluten-free. Hmmm… Even if the ingredients are natural, I always choose fewer ingredients in a product when given the choice. I opt to shred my own. You can shred an entire block of cheese in 10 seconds. Done. Carrots? Done. Broccoli stems for slaw? Done. The work bowl of my food processor is in the top rack of my dish washer nearly every time I run a cycle.

We can talk about the slicing disk, and the dough blade later – you should be convinced by now anyway! Oh, we will also talk later about processing your own chicken for chicken burgers – I know I would rather know where my ground meat comes from, if it is an option!

To answer the question I often receive of “When would you use …” – here are some recipes I have posted to date where I used my food processor:

Food_050_

Green Goddess Dip – Used to blend the ingredients together

Chocolate Hazelnut Spread

Chocolate – Hazelnut Spread – Used to blend the ingredients and melt the chocolate

Spinach Walnut Pesto

Spinach – Walnut Pesto – Used to blend the ingredients

Quinoa Casserole 1

Quinoa and Egg Breakfast Casserole– Used to shred the cheese

Cherry - Coconut Scone

Cherry – Coconut Scones – Used to combine the ingredients into a course dough

Pumpkin – Gruyere Focaccia – Used to shred cheese and puree pumpkin

Middle Eastern Bison Pita Sliders

Middle Eastern Bison Pita Sliders – Used to make the filler for the meatballs

* I have not been compensated for this post, but – if I did the links correctly – I will receive a small percentage of the purchase price of purchases made through the link to my aStore. Checkout is 100% through amazon.com and I will not see your credit card information.

Cucumber – Avocado Salad

5 Aug

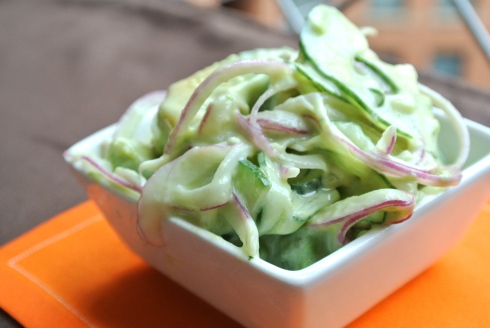
Cucumber - Avocado Salad 2This Cucumber – Avocado Salad is mega healthy, crazy tasty, and super fast.

And yes, it deserves all of those edgy adjectives.

This side dish is made with only a few ingredients, all healthy {I am not worried about the one teaspoon (max) of sugar}! If you use a mandolin or vegetable peeler, you can shave the vegetables in seconds, and have this dish ready in five minutes MAX. If you use a knife, it should still be pretty fast, but be sure to cut the cucumber and onion as thin as possible. You could also try dicing the cucumber and onion, but I like the texture of the thin slices, and they are easier to spear with a fork.Cucumber - Avocado SaladIngredients:

– 1/4 cup fat free plain Greek yogurt
– 1 t white wine vinegar
– 1/2 – 1 t sugar
– 1 c cucumber, very thinly sliced
– 1/4 – 1/2 c red onion, very thinly sliced
– 1 ripe avocado, diced

How do I make it?

  • In a medium bowl, whisk together the yogurt, vinegar, and sugar. You can use a spoon or fork, I am sure, if you don’t want to dirty a whisk.
  • Add the cucumber and onion, and stir to coat the vegetables with the yogurt mixture.
  • Add the avocado, and stir to cover.

More information please?

I always use unpeeled seedless cucumbers. See the nice color it adds? It also provides a good crunch. If I am in a pinch with a regular cucumber, I peel it, slice it the long way (so it looks like two … canoes or something) and scoop out the seeds with a spoon. I have never appreciated cucumber seeds.

One of my frustrations with gathering my favorite recipes and figuring out the best method by which to organize them (one of my primary reasons for starting this blog) is that they all originate from different sources – magazines, emails, blogs, cookbooks, you name it. This recipe was hiding within another recipe – buried in a recipe for Chicken Burgers (also delicious). I have nothing against the chicken burgers, but this Cucumber – Avocado Salad should have been highlighted as a headliner, not barely visible as a nameless backup dancer (described only as “avocado mixture” : ( ). Pretty hard to organize recipes even by title, when working with a back-bencher. That is why on my blog I will try to break all recipes or composed meals down to the building blocks. I hope you agree it is helpful!

Cucumber - Avocado Salad 3Original link: http://www.self.com/fooddiet/recipes/2013/03/spicy-chicken-burgers

Spinach – Walnut Pesto

28 Jul

Image

Traditional pesto is made with basil, garlic, parmesan reggiano, olive oil, and pine nuts – but there is nothing that says we can’t mix that up a bit. I find that pesto made with all basil is just a bit too basil-y for me – and pine nuts are disproportionately expensive recently.

That brings us to Spinach – Walnut Pesto. Equal parts basil and baby spinach, and a handful of toasted walnuts. I am sure I will offend someone with this, but it tastes the same to me! And I like the added health benefits (no matter how small) of spinach and walnuts.

Ingredients:
– 1/4 c walnuts, chopped, and toasted in a pan or in the oven until they smell fragrant
– 40 basil leaves (about 1 c)
– equal amount of baby spinach {just measure the piles if your baby spinach leaves are very different in size from the basil}
– 2 cloves garlic, roughly chopped
– extra virgin olive oil
– 1/4 – 1/2 c parmesan or parmesan reggiano cheese, grated or shaved

How do I make it?

  • Place the toasted (cooled) walnuts, basil, baby spinach, and garlic in a food processor, and pulse until the walnuts and garlic are chopped very finely.
  • Add some olive oil, streaming it in if you can, while you pulse the food processor.
  • You can either process the cheese, or stir it in, depending on your tastes. There is not much difference, really, but it is up to you.
  • Use as much or as little oil and cheese as you would like! It can be thick or thin – there is no wrong way to make a pesto.

More info please?

Spread this pesto on any sandwich or burger; serve as a dip with crackers or veggies; or heat a pan with some oil over medium heat and add spaghetti squash, using two forks to separate the spaghetti strands and incorporate the pesto (a little pesto goes a long way on this one!). Or use as a pizza topping with some ricotta cheese and roasted vegetables!

Spaghetti Squash w Spinach Pesto

Quinoa Tabbouleh

15 Jul

Quinoa Tabbouleh

Could it be hotter outside? And could this dish look more refreshing?

And can you kind of see my reflection, upside down in the spoon?

Cool, crunch, mint, and quinoa … it even sounds refreshing. Toss this dish together for a summer BBQ bring-along, or keep a bowl of it in your fridge this week for after-work snacks. The flavors are traditional so it will pair with anything.

Ingredients:

– 2 T extra virgin olive oil
– juice from one lemon, freshly-squeezed
– 2 garlic cloves, minced
– 3 c cooked quinoa, cooled (this is how much 1 c dry quinoa will yield)
– 1/2 c finely chopped seeded, peeled cucumber (I use seedless english cucumbers when I can)
– 1 tomato, peeled, seeded, and diced
– 1/4 c fresh mint, chopped
– 1/2 c flat Italian parsley, chopped
– S + P

How do I make it?

  • Whisk the oil, lemon juice, and garlic together in a small bowl. Season with salt and pepper if you would like.
  • To the quinoa, add the cucumber, tomato, mint, and parsley, and stir.
  • Add the dressing, and stir to coat. Taste and season a bit more if you would like – start slow, you can always add more. That’s it!

Original recipe: Bon Appetit, February 2008, p. 16. I found the table of contents from the February 2008 issue, but they apparently did not post to this recipe online: http://www.bonappetit.com/magazine/toc/february_2008_toc .  This recipe (like many of mine!) was in my stack of ripped-out magazine pages. I know you have one too!

Chocolate – Hazelnut Spread

6 Jul

ChocHazelnut Spr_017_One night in law school, I had plans to go out for frozen yogurt with a friend. She called about a half hour before to ask if I was ready, and I looked at the spoon in my hand sheepishly. “Um, I think I can’t go for ice cream. There was an incident … involving a jar of Nutella … and a spoon.” I am thankful that my sometimes uncanny memory is not letting me remember how much Nutella I actually had that fateful day, but suffice it to say, I always want more Nutella.

People routinely ask me how I can cook and bake so much and not eat entire roasts and cakes. I always answer that I have just convinced myself that I can’t eat an entire batch of whatever, if I want to live a reasonably healthy life. There are a few things I make, though, that push my willpower to the max. This Chocolate – Hazelnut Spread is one of those dangerous recipes. Accordingly, I highly recommend two things, if you are going to make this recipe.

  1. Have plans later that day (lest you stay home and finish the 3 CUPS that this recipe yields), and
  2. Have some jars on hand (like those pictured in this post, which were under $2 at the Container Store), to pass on the love to your friends.

With those disclaimers, on to the good stuff!

Ingredients:
1 stick unsalted butter, softened
– 1 c hazelnuts (may be called “filberts” at the store)
– 7 oz bittersweet chocolate, chopped (I used Ghirardelli bars – they are so thin that they are easy to chop and melt)
– 2 oz unsweetened chocolate, chopped
– 1 can sweetened condensed milk (I used fat free – hey, every bit helps, right?)
– pinch of kosher salt
– small pot of boiling water

How do I make it?

  • Preheat the oven to 350°.
  • In a medium ovenproof skillet, melt 1 T of the butter. Add the hazelnuts and cook over moderate heat, stirring, until they just start to brown, about 3  -5 minutes.
  • Transfer the skillet to the oven and roast the nuts for 5 – 10 minutes, until the skins blister. Keep an eye on them! It’s ok if they get a little dark – this will help you get the skins off later.
  • Transfer the nuts to a kitchen towel and rub off the skins. I worked in batches and had to transfer to about 4 kitchen towels (the skins stick to the towels), so have a few on hand just in case. By the time you’re done, the nuts should be cool. If you’re super-fast and they are not yet cool, let them sit until they are.
  • In a food processor, combine the hazelnuts with both chocolates and process until the nuts are finely chopped and the chocolate just begins to melt. It will melt just from being processed. This took only about 30 seconds for me, but may take a bit longer depending on the chocolate you use.
  • In a small saucepan, heat the sweetened condensed milk with the salt until hot. This will not take long – maybe 2 – 3 minutes.
  • Add the hot sweetened condensed milk and process until incorporated.
  • Add the remaining 7 T of butter and process until smooth.
  • Add boiling water, 1 T at a time. Process until creamy and delicious! If you have to taste it along the way, for “quality assurance,” I promise you I will understand.

ChocHazelnut Spr Square

More info please?

You should keep this refrigerated once made. If it is cold and you want to thin it out a bit for spreading, just add a little boiling water and stir. You won’t be watering it down, I promise! Just add a tiny bit at a time.

Original link: http://www.foodandwine.com/recipes/hazelnut-chocolate-spread

ChocHazelnut Spr_020_

A very special thanks to ARB for her help with the VERY difficult task of selecting the right pictures for this post!

Bison Chili

29 Jun

Image

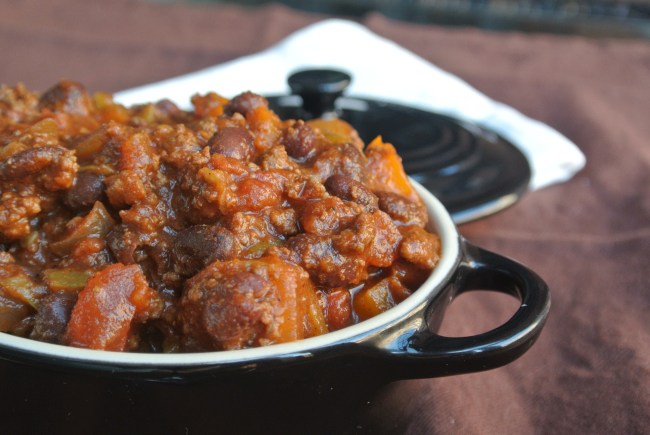
Yes, it is the middle of summer. But I am always in the mood for healthy, filling meals. This Bison Chili recipe is always a pleaser, and is packed with healthy ingredients. This recipe looks long – which is dissuading to some – but you should think of it as: a lean meat, a few produce items, a few spices, and a few canned items. That does not sound at all intimidating, does it? Didn’t think so.

I will go so far as to classify this as “in-stock” – while I may not always have a bell pepper on hand, I do usually have the remaining ingredients, and that pepper can certainly be optional.

Ingredients:
{your lean meat … }
– 1 lb ground bison
– 1 sweet onion, diced

{next up: produce items … }
– 2 cloves garlic, minced
– 1 bell pepper, any color, diced

{delicious spices follow … }
– 2 – 3 T chili powder (I used 1 T light and 1 T dark)
– 2 t cocoa powder
– 1 t kosher salt
– 1 t dried oregano (crush with your hand)
– 1 t cinnamon
– 1 t ground cumin
– 1/2 t freshly ground black pepper
– 1/4 t allspice

{and finally, your canned items … }
– 3 oz tomato paste
– 28 oz canned diced tomatoes
– 2 cans beans, rinsed (I used 1 can kidney, and 1 can black beans)
– 7 oz hot diced green chiles

How do I make it?

  • I recommend prepping all of the ingredients beforehand – chopping the produce, measuring the spices into one small bowl, and opening the cans.
  • Heat a medium to large dutch oven over medium-high heat. Add the bison, and cook for a few minutes, breaking it up with a wooden spoon. You should not need oil, because the bison should produce (just enough) grease.
  • When the bison is almost all browned, add the onion and garlic, and cook for a few minutes. Then add half the bell pepper and cook for another few minutes.
  • When the veggies look softened a bit, add the rest of the bell pepper. Then add the spices – all 7 of them, cocoa powder through allspice. Cook for 1-2 minutes until you can smell the spices blooming – not too long though because you don’t want it to burn on the pan.
  • Add the tomato paste, and stir and cook for about a minute.
  • Then add the canned diced tomatoes, beans, and chiles. If it looks pretty thick – which I am betting it might – add about a cup of water.
  • Simmer for as long as you can – I usually can’t wait more than about 5 minutes to try a bowl (there is a POT of CHILI on my stove – how am I not supposed to eat it asap?), but I do try to leave the rest simmering for 30-45 min.

Bison Chili

Original link: http://www.aviewofamerica.com/Recipes/Bison/rusticbisonchili.htm